

The Log Cabin


Next couple of quilts…
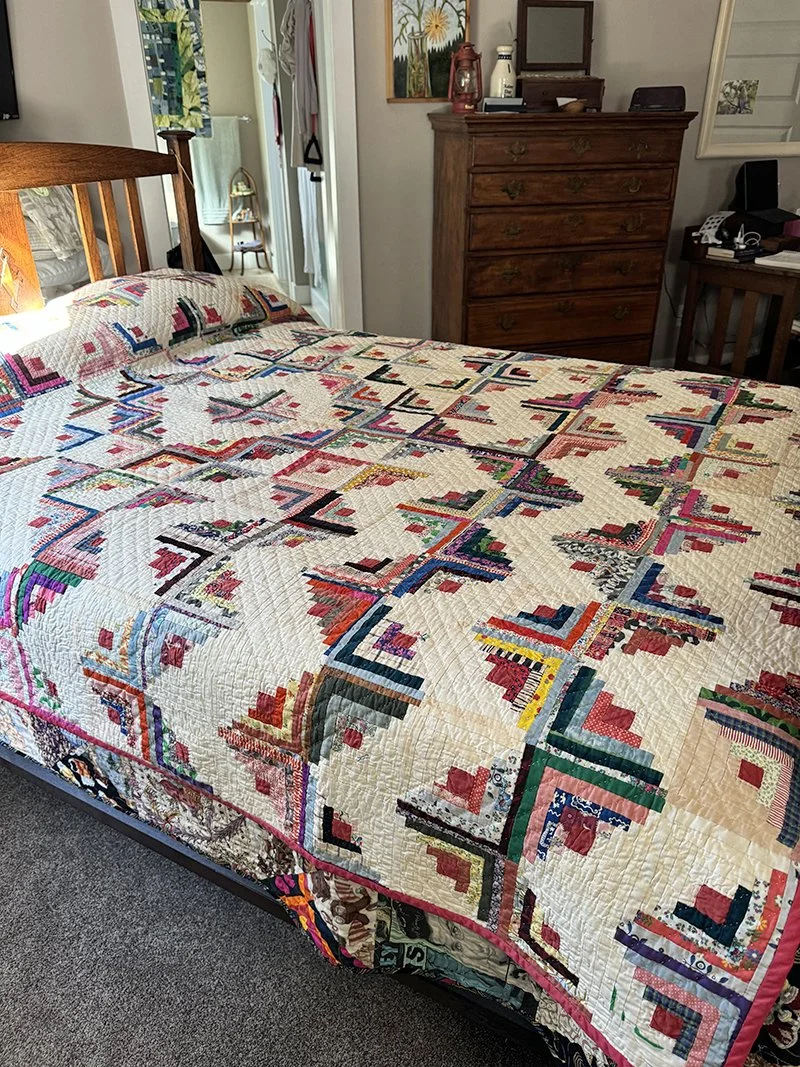
My story left off when I was making the log cabin quilt that I still love. I decided to have bright red be the primary zinger, which, by then I thought must not be too dominant in amount of coverage in order to zing the way I wanted. I used a lot of white (all different whites, some of the white corduroy I used in my sister’s drunkard’s path (wonder who gave me that? I was using it up for years) and “whites” as “off” as tan, also in tiny strips opposite the red and other bright colors of log strips. Each block was 6” square, and often had as many as 8 or 9 layers of strips. By the time I “trued” them all to size, I remember I had a rotary cutter (very small set; so much more difficult to use than the larger ones that came out later, or I allowed myself to afford later). Then came the challenge of choosing a log cabin design, “streak of lightening”, “barn raising” I cannot remember all the choices, and of course (knowing myself as well as I do now) I could not choose just one, so had a “barn-raising” focal point near the top third of the piece, and “lightening” for the rest.
It took a year at least, to piece it, all by hand, which, at the time, seemed superior to any other way, and which I could take anywhere, to work on, according to my compulsive attention to the matter of making all the quilts in a lifetime that I could. I remember sewing in cars, boats, on vacations, watching TV and was young enough that I didn’t even need “enough’ light to sew. I had learned that a running stitch was the best way to hand piece for an attractive appearance, and my stitches were tiny. The center, or chimney of each block was bright red; a luscious saturated cotton solid that I bought for the purpose. Each chimney was 1” square.
I quilted it on a wooden frame that I mail-ordered from somewhere(?) Wonder if Sears was still an option in 1979? I remember working on it at our apartment in Allston, MA, and in Cazenovia, NY at our “new” home (* Woodbine Cottage quilt and story). What heady days; a home of our own, a garden to plan for, mountains of snow outside, and a baby growing inside me. I made the quilting extra difficult by not “quilting-in-the-ditch” or going along the edges of seams. Instead, thinking it would be more durable, though aware how much harder it was, I made a log cabin design going opposite to the seams of the pieced design; often having to put the tiny “10 needle through 4 layers of fabric while trying to keep the stitches the same size. I bound the quilt in continuous bias binding I learned how to do from a book, probably the Perfect Patchwork Primer by Beth and Jeffrey Gutcheon), but did not mitre the corners, in bright red *(continuous bias binding).
Sometime along here, before my son was born in May of 1980, I made his quilt, which also had 1’ squares as focal points. It was a modified “wedding ring” modified by using curved strips instead of pieced strips to make the rings, connected by the red squares. It had only 4 fabrics, the red, of course, muslin, and two prints combining those two colors with blue. (Maybe I made the quilt after he was born, since I hadn’t known the child would be male). I also hand-quilted the piece and used the same red bias fabric to bind it as I had used in the log cabin, also without mitered corners (I mention the corners only because finesse-ing the corners with mitres is something I learned later, and seemed like a big deal at the time. ). In each of the “chimneys” that popped up on Jonathan’s quilt, I quilted a tiny heart in red thread, so the little hearts showed on the back.
*(On to the “White Quilt”)